WordPress is most popular Content Management System (CMS) to create websites. it offers great features and make it very simple and easy to create and manage websites.
You can learn how to use WordPress to publish content on the web very easily. There are so many free and paid video courses available to learn WordPress. Udemy, Youtube, Lynda and many other websites have video courses and tutorials about WordPress.
To create a website you need a Domain name (address of your website e.g google.com) and some online storage to store your website files. After buying Domain name and web hosting you can install WordPress or any other CMS on your web server to create a website.
If you are new to WordPress or Web Design and development and you don’t have a web hosting account (Domain name and online storage) to install WordPress. I have a good news for you, you can install WordPress locally on your Windows PC, Linux or MAC. in this tutorials you will learn how to install WordPress on your Windows PC with WAMP Server?
With WAMP server you can create a fully functional website on your PC to learn how WordPress works, but this site will be visible to you only. People on the internet won’t be able to view/access your site until you transfer your site to live web server.
How To Install WordPress Locally On Windows PC With WAMP Server ?
In this article, I am going to show you how to install WordPress locally with WAMP Server. To install WordPress locally you need to create a server environment.(e.g. PHP, MySQL, Apache). You can install these components individually or you can use ready to use packages such as WAMP Server (for windows), MAMP Server (for MAC) or XAMPP (for both Windows and MAC).
I will use WAMP Server that is free. You can download it free from WAMP Server site.
What We Need ?
WAMP Server
Download WAMP from http://www.wampserver.com/en/ and install WAMP Server.
WordPress
Download latest version of WordPress from http://wordpress.org/download/ and extract all files.
7-Zip is a free software to extract zipped archives.
You can download 7-Zip from http://www.7-zip.org/download.html
Warning
If you are using Windows XP, latest version of WAMP might not work properly, You may see an error during installation. In case of any error try to download and install older the version of WAMP Server e.g WAMP 2.1.
If you installed Skype or Team Viewer, close them before installing WAMP otherwise, WAMP won’t be able to run sometimes.
Creating Database To Install WordPress Using PHPMyAdmin In WAMP ?
if you have installed WAMP server successfully, now run WAMP you can click on WAMP icon to start WAMP. If all works fine you will see a green WAMP icon at the bottom right corner of your screen, where time is displayed.
Now open your favorite browser e.g. Chrome, Firefox and type localhost in the address bar.
Now right click on PHPMyAdmin or just type http://localhost/phpmyadmin/ in the location bar to open PHPMyAdmin. Use user name root leave password field blank and hit enter to access PHPMyAdmin. You will see following page.

Enter database name e.g. WordPress or anything you like (e.g. wp1, wp2. wp3) and click create button. You can also create multiple databases to for multiple WordPress installations to test different WordPress versions, themes, plug ins, sites.
Now we need to place WordPress files in WWW directory, To open WWW directory click start and RUN and type c://wamp/www/ to open WWW directory or you can find WWW directory in C:// drive under wamp folder.
Copy WordPress files to WWW folder
Extract all WordPress files from the zipped archive that you downloaded earlier. Copy extracted WordPress folder in WWW directory.
Now open WordPress folder and find wp-config-sample.php file and rename it to wp-config.php or you can make a copy of wp-config-sample.php and rename second wp-config-sample.php, because we need to enter database information in the wp-config.php file and if you will make any typing mistake WordPress won’t install.
Open wp-config.php file in text editor e.g. notepad don’t use Microsoft Word to edit wp-config.php or any other WordPress file, because Microsoft Word will add extra code to these files and files won’t work.
Find following lines
// ** MySQL settings - You can get this info from your web host ** //
/** The name of the database for WordPress */
define('DB_NAME', 'database_name_here');

/** MySQL database username */
define(‘DB_USER’, ‘username_here’);

/** MySQL database password */
define(‘DB_PASSWORD’, ‘password_here’);

/** MySQL hostname */
define(‘DB_HOST’, ‘localhost’);
and replace database_name_here with your database name, in my case my database name is wordpress, replace username_here with root, that is default user name for WAMP server and just remove password_here because password is blank for WAMP server.
MySQL host will remain localhost.
After adding necessary information above lines should look like this.
// ** MySQL settings - You can get this info from your web host ** //
/** The name of the database for WordPress */
define('DB_NAME', 'wordpress');

/** MySQL database username */
define(‘DB_USER’, ‘root’);

/** MySQL database password */
define(‘DB_PASSWORD’, ”);

/** MySQL hostname */
define(‘DB_HOST’, ‘localhost’);
Save your file as wp-config.php and close it.
Installing WordPress
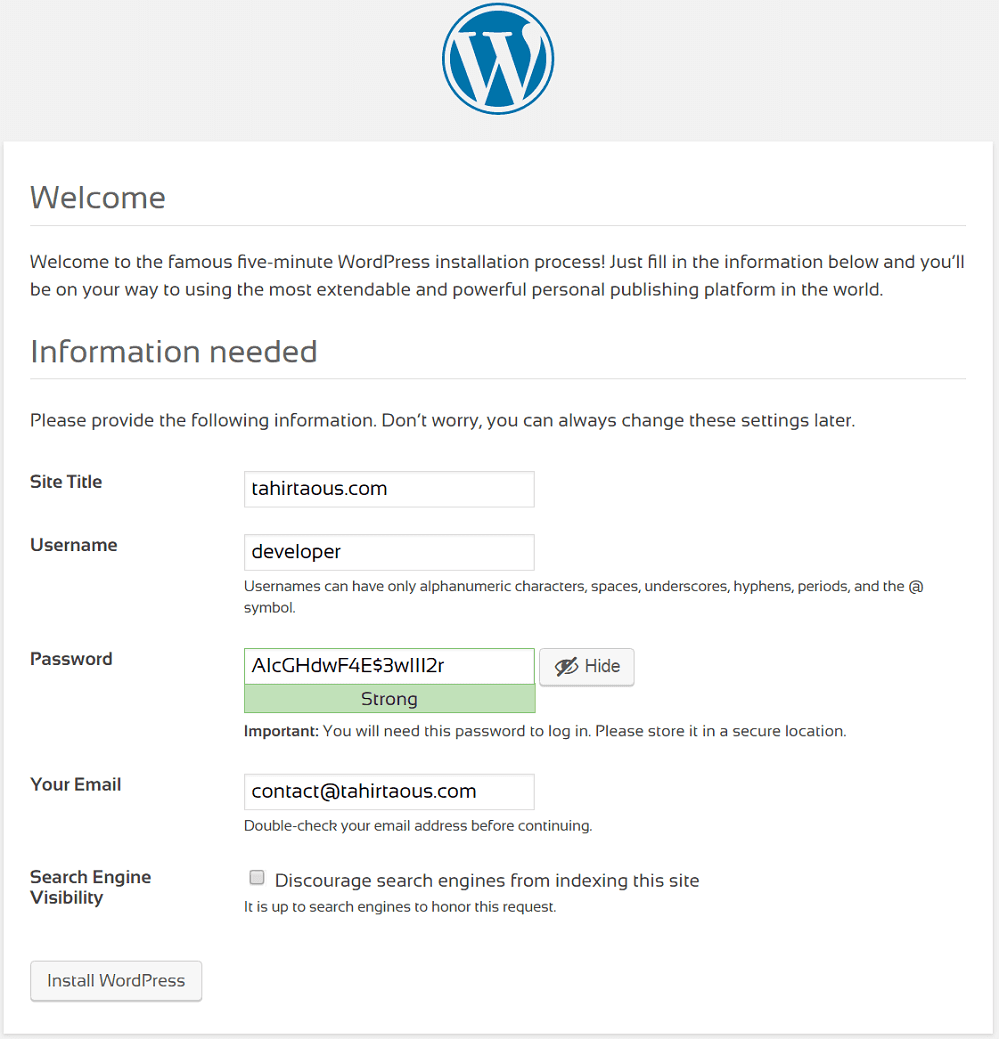
Now we can start WordPress installation. Type localhost/wordpressin the address bar of your browser and you will see WordPress installation page.
Enter site title, user name, password, email and click install WordPress to begin WordPress installation.

WordPress will take few seconds to install. When your installation is complete. Type localhost/wordpress/wp-admin to log in to your local WordPress installation.
Enter user name and password you used during installation. If you can access your local WordPress website, it means everything is working great.
That’s all
Now you know How To Install WordPress On Windows 7 to set up a local development environment. You can start using WordPress for local development or if you are an absolute beginner you can learn about WordPress.

Leave a Reply